When I was first learning to quilt, one of the very first books I bought was one by Fons and Porter.
This is a GREAT book for a beginner or one who wants to learn to do different blocks. It covers piecing, applique, and quilting. THIS is where I learned how to do my star quilts.
So here we go.
For this star, we will use 5 different colors. If you want a star with more 'rows' in it, or less, you can do that also. But for today, we'll be sewing a star with three 'rows'. If you want to use only three colors, you can do that also.
The first thing you want to do is make a diagram of your large diamonds. Mark where the colors go. I also list what colors go with which numbers. It really helps to keep the colors where you want them to go. Like this.
This is how you are going to sew your strips. So I made a little diagram of that also, as it helps to keep things straight. It's so easy to mix things up sometimes :)
Can you see how you can use 2 or 3 colors instead of 5? Strips 1, 3, 5 can be one color, strips 2, 4 another. Or 1 and 5 can be the same color, and 2, 3, 4 different. You can do it however you like. I am using these 5 colors, with the gray swirl as the background.
You will need:
One 2.5" x wof (width of fabric) strips for fabric 1
Two 2.5"x wof strips for fabric 2
Three 2.5"x wof strips for fabric 3
Two 2.5"xwof strips for fabric 4
One 2.5" x wof strips for fabric 5
And two 9 1/4" x wof strips for background.
Line your strips up just like in the second diagram. You'll have three strip sets.
Lay strip 1 right side up, lay strip 2 right sides down on top of it, 2 1/4" from the top.
Sew your strip sets, making sure they are all tiered.
Gently press the seams. On strip set one, press both seams towards the right, strip set two, to the left, and strip set three to the right.
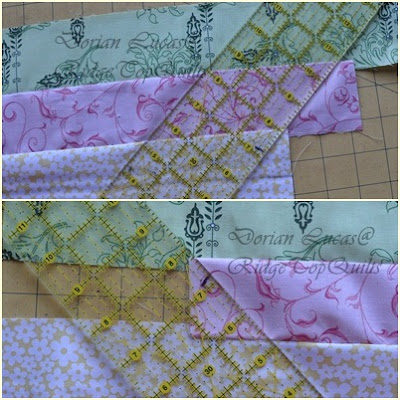
Now you want to cut a 45 degree angle off the edge. Lay your strip set down with the edge going along a line. And put your ruler on it, so the 45 degree mark is along that same line.
See the arrows? The 45 degree mark is the bottom one. The top one shows where to align the ruler on the tiered parts.
After cutting off this piece, I like to turn my strips vertical, with one side along a ruled line. And line up your ruler so that you are cutting a 2.5" strip.
You can also put your 45 degree mark that is on the ruler, along your 45 degree cut line.
Cut 8 diamond strips out of EACH strip set.
You want to make sure that you cut all three strip sets in the same direction. DO NOT do one or two of the strips the other way. Either cut to the left, or to the right.
But do the same on all three sets, or your diamond strips wont match up.
Take your first two strip sets, matching rights sides together. Make sure that your tips hang off the edge 1/4", or your seams will not line up.
Your seams should look like this.
Sew your 1/4" seam allowance. Go ahead and chain stitch all 8 strip sets together. Press the seam toward strip one.
Add your third row. Notice how your seams match up this time.
Press your seam in the same direction as the first one.
You should have 8 big diamonds now. They should measure 16.5" from tip to tip (longways) and 9" along all sides. Lay them out so that they are all the same way. your 1's should be on the top, 5s in the middle.
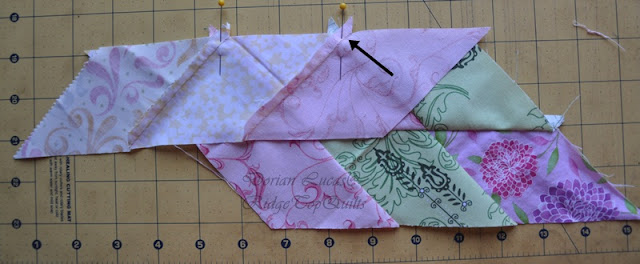
Take two diamonds and put them right sides together. Match your seams. And pin.
Your seams should nest nicely together.
Sew your 1/4" seam. Make SURE you start 1/4" down from the tip, taking a backstitch or two. This will allow you to set your Y seams in.
Here's the back. It's just finger pressed, as I couldn't run my iron. But you can see all the seams are lying nicely.
Sew four sets of 2 big diamonds. Make sure you press all the seams in the same direction.
Here's what the middle looks like, once two big diamonds are sewn together.
Put two sets of 2 diamonds together. Pin and sew as before, remembering to start at the 1/4" mark.
You should now have two sets that look like above picture. Here's a close up of the middle, where all the seams come together. You should have a nice 1/4" seam.
Sew your two halfs together, starting at the 1/4" mark again. An almost perfect center :)
All your long seams of the big diamonds, should be pressed in the same direction.
Now to add your background squares.
Cut six 9 1/4" squares. Cut two of those squares on the diagonal. Add your squares first, and then your triangles.
Go here for the tutorial on setting your background pieces in. The tutorial just shows how to add one piece. But you do it the same way with all your squares and triangles.
The squares will be a bit bigger than the triangles, when you have them all pieced in. Meaning the squares will stick out a bit more, they will not be even along the sides. That's ok, I just like to make sure I have enough wiggle room to square it up nicely.
And there you have it! A beautiful diamond, set in stone ;)
Here is a linky thing, so you can share pictures of your stars. I would LOVE to see them!!
PS, don't forget to drop me a comment and leave me your name, if you're a wantobe quilter! LOTS of prizes you could win over at the Stash, come August.


17 comments:
Thanks for the great tutorial!!
Absolutely marvelous tutorial!! Thank you very much for linking up to Toot-torial Tuesdays at RocknQuilts.blogspot.com All the Best, Mary Ann
Great tutorial! I have wanted to make a lone star quilt forever (I'm from Texas) and haven't built up the courage to do it. Your tutorial is making it seem like I could do one tonight. Going to give it a try... thanks for making it approachable!
Dorian ... thank you sew much, sweetie ...
{{{{{hugs}}}}} Pat
thanks for the lessons sis!
the stars are beautiful but you make it look sew easy! i can hardly wait to make my stars. i am going to practice on smaller pieces as i need new placemats and potholders.
love ya
Hey Dorian, I am giving this a go (because I LOVED it) but I can't get the diamonds to line up. Any suggestions on how I can figure out what I am doing wrong? I have followed the tutorial above but still having issues :( Any tips would be great :)
That's the first quilt book I bought! I recommend it to anyone interested in learning to quilt and it's always the one I turn to for help!
What a great tutorial! Thank you! What is the size of your finished block?
Thanks for this tutorial, and thanks for making it easy.
I need to know how to do this with 4colors rather than 5. Please help! I have sewn strips A, B, C, D together and strips B, C, D, C but don't know what order to put the diamonds in. Thank you!
Thanks so much for this! I want to try one and your directions are great. Lone stars are so beautiful!
this is the best and most helpful advice I have seen on the internet on lone star quilt than k you
Thank you so much for this tutorial.
The first quilting book I bought was also Fons And Porters and I have wanted to make a Star of Bethlehem aka Lone Star quilt ever since.
I have started making it with six fabrics but thought the instructions for pressing were not going to make the seams match up. I figured they should be pressed alternatively.
You have confirmed this for me. You have done a wonderful job and provided clear and coherent information.
Great tutorial!!!! Thank you!
This is the best tutorial I've seen for making the Lone Star. I've made several Lone Stars and you never get to many tips on piecing them.
I have that book! The binding is cracked because I've used it so often.
One of these days I have to try a Lone Star. Yours is beautiful.
What size is this quilt block?
Post a Comment