Sunday, July 31, 2011

wantobe quilters campaign!

 Starts tomorrow!!!


It's going to be FILLED with great prizes, lots of great blog posts on Stash manicure, some great guests I hear too.

Don't forget my friends who have signed up under me. When you make a comment, to leave my name or blog name in your comment....like "blah,blah,blah...ridgetopquilts (or Dorian) sent me"

That way, it will make it easier for Samm and her helpers to keep us all together if we win something!

Have fun! I know I am going to....

A little secret....I will be a guest poster in September! A post just for you beginners!


PS, don't forget to drop me a comment and leave me your name, if you're a wantobe quilter! LOTS of prizes you could win over at the Stash, come August.
post signature

Friday, July 29, 2011

A few medallions

Howdy everyone, hope you are cool, wherever you are. We are going to hit about 97 today, and that is HOT in my opinion. LOL. So I am trying to stay cool indoors....sewing of course, what else ;)

Here is my Lone star medallion (I wish I would of changed my yellow and pink around, so the yellow doesn't blend into the swirls so much...sigh~)


 And here is Pat's pretty medallion. She is using scraps leftover from her bedroom make over, which you can go here to read about.


 Please feel free to send me pictures of your medallions!

I've also started a flikr group for us.

Lone star quilt along group

I hope that works. You should all be able to join and upload photos to it. Or start a discussion/etc. I've never done this before, so if there is something not right, please let me know.

Have a great day!

PS, don't forget to drop me a comment and leave me your name, if you're a wantobe quilter! LOTS of prizes you could win over at the Stash, come August.
post signature

Thursday, July 28, 2011

Lone star quilt along fabric req.

 Hello everyone, sorry I didn't get any fabric requirements or such up yesterday. I got lazy I guess ;) lol


Here is what my wall hanging will look like.


 Fabric A ---green, 1 1/4 yrds
 Fabric B ---yellow, 3/4 yrds
 Fabric C ---light pink, 1/2 yrds
 Fabric D ---gray, 3/4 yrds
 Fabric E --- dark pink, 1/4 yrd

You can use scraps of course, the lone star and the corner stars are all made of 2.5" and 2 7/8" strips. The big diamond shapes in the rectangle border are 15" x 9 " rectangles, cut into diamonds.  I'll show you how I do that when we get to them.

I would love to see anyones stars! You can leave me a comment and I can email you to get your picture and post it. I'll see about starting a flikr group too.

~~~~~~~~~~~~~~~~~~~~~~~~~~~~

On another note. There is only FOUR more days till wantobe quilters campaign starts! You can NOT win unless you are registered with anyone that has the wantobe quilters button on their blog.

You can win if you are a wantobe or if you are an expert quilter, or anywhere in between.

Wantobe's need to post comments on Stash Manicure on Mon, Wed, Fri and those who have done some quilting on Tues and Thurs.

If you want in on the fun, I need your name and email addy!

 Have a great day!

post signature

Tuesday, July 26, 2011

Lone Star Tutorial

 I'm linking this tutorial up with Mary Ann! Thanks MaryAnn. And Quiltstory, thanks H&M!

 When I was first learning to quilt, one of the very first books I bought was one by Fons and Porter.


This is a GREAT book for a beginner or one who wants to learn to do different blocks. It covers piecing, applique, and quilting. THIS is where I learned how to do my star quilts.

So here we go.

For this star, we will use 5 different colors. If you want a star with more 'rows' in it, or less, you can do that also. But for today, we'll be sewing a star with three 'rows'. If you want to use only three colors, you can do that also.

The first thing you want to do is make a diagram of your large diamonds. Mark where the colors go. I also list what colors go with which numbers. It really helps to keep the colors where you want them to go. Like this.


This is how you are going to sew your strips. So I made a little diagram of that also, as it helps to keep things straight. It's so easy to mix things up sometimes :)


Can you see how you can use 2 or 3 colors instead of 5? Strips 1, 3, 5 can be one color, strips 2, 4 another. Or 1 and 5 can be the same color, and 2, 3, 4 different. You can do it however you like. I am using these 5 colors, with the gray swirl as the background.


You will need:

One 2.5" x wof (width of fabric) strips for fabric 1
Two 2.5"x wof  strips for fabric 2
Three 2.5"x wof strips for fabric 3
Two 2.5"xwof strips for fabric 4
One 2.5" x wof strips for fabric 5
And two 9 1/4" x wof strips for background.

Line your strips up just like in the second diagram. You'll have three strip sets.

Lay strip 1 right side up, lay strip 2 right sides down on top of it, 2 1/4" from the top.


Sew your strip sets, making sure they are all tiered.


Gently press the seams. On strip set one, press both seams towards the right, strip set two, to the left, and strip set three to the right.

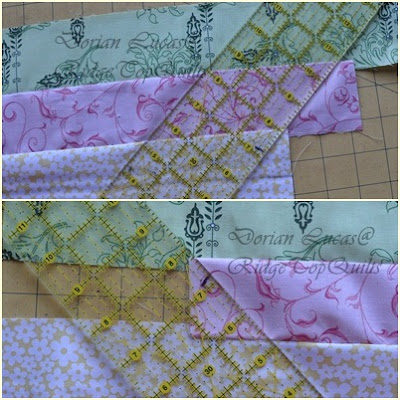
Now you want to cut a 45 degree angle off the edge. Lay your strip set down with the edge going along a line. And put your ruler on it, so the 45 degree mark is along that same line.


See the arrows? The 45 degree mark is the bottom one. The top one shows where to align the ruler on the tiered parts.

After cutting off this piece, I like to turn my strips vertical, with one side along a ruled line. And line up your ruler so that you are cutting a 2.5" strip.


You can also put your 45 degree mark that is on the ruler, along your 45 degree cut line.

Cut 8 diamond strips out of EACH strip set.


You want to make sure that you cut all three strip sets in the same direction. DO NOT do one or two of the strips the other way. Either cut to the left, or to the right.


But do the same on all three sets, or your diamond strips wont match up.

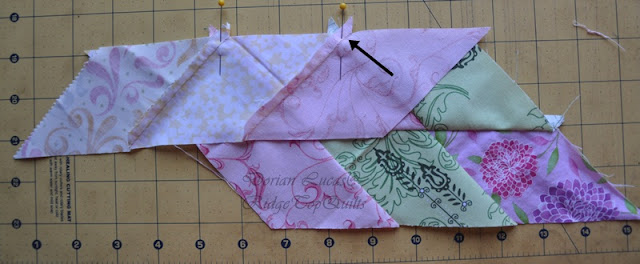
Take your first two strip sets, matching rights sides together. Make sure that your tips hang off the edge 1/4", or your seams will not line up.


Your seams should look like this.


Sew your 1/4" seam allowance. Go ahead and chain stitch all 8 strip sets together. Press the seam toward strip one.

Add your third row.  Notice how your seams match up this time.

 Press your seam in the same direction as the first one.


Trim up your edges. Be very careful with these diamonds, they get stretch out easily.


You should have 8 big diamonds now. They should measure 16.5" from tip to tip (longways) and 9" along all sides.  Lay them out so that they are all the same way. your 1's should be on the top, 5s in the middle.

Take two diamonds and put them right sides together. Match your seams. And pin.


Your seams should nest nicely together.


Sew your 1/4" seam.  Make SURE you start 1/4" down from the tip, taking  a backstitch or two. This will allow you to set your Y seams in.


Open up, and press seam to either side.


Here's the back. It's just finger pressed, as I couldn't run my iron. But you can see all the seams are lying nicely.


Sew four sets of 2 big diamonds. Make sure you press all the seams in the same direction.

Here's what the middle looks like, once two big diamonds are sewn together.


Put two sets of 2 diamonds together. Pin and sew as before, remembering to start at the 1/4" mark.


You should now have two sets that look like above picture. Here's a close up of the middle, where all the seams come together. You should have a nice 1/4" seam.


Sew your two halfs together, starting at the 1/4" mark again. An almost perfect center :)


All your long seams of the big diamonds, should be pressed in the same direction.

Now to add your background squares.

Cut six 9 1/4" squares. Cut two of those squares on the diagonal. Add your squares first, and then your triangles.

Go here for the tutorial on setting your background pieces in. The tutorial just shows how to add one piece. But you do it the same way with all your squares and triangles.

The squares will be a bit bigger than the triangles, when you have them all pieced in. Meaning the squares will stick out a bit more, they will not be even along the sides. That's ok, I just like to make sure I have enough wiggle room to square it up nicely.


And there you have it! A beautiful diamond, set in stone ;)

Here is a linky thing, so you can share pictures of your stars. I would LOVE to see them!!


PS, don't forget to drop me a comment and leave me your name, if you're a wantobe quilter! LOTS of prizes you could win over at the Stash, come August.
post signature

Sunday, July 24, 2011

Quilt along AND tutorial :)


 Good morning everyone, hope you are staying cool...or warm...depending on where you are at. I know that half the US is broiling right now.

Thank you for taking time to enter my poll. It's about 50-50 when I stopped it this morning. With a few of you who are partial to either one. SO, I am going to do both :)

On Tuesday, I'll post a tutorial for the Lone star medallion. For those of you who want just a tutorial.

For those of you who want to do a quilt along, I'll post on Wed the fabric needed and such. And let you get on with making the lone star. Then next week we'll do the side blocks, and then the week after, the corner blocks. How's that sound?

And looky, I even made us a button!! Thanks to Carrie over at Oikology 101. Not only does she have a great tutorial for making buttons, but that same tutorial helped me with my signature line too :) So thank you Carrie!

Ok, here is the schedule again:

Tues, July 26th, I'll post the Lone Star tutorial.
Wed, July 27th, I'll post fabric requirements for the quilt along.
 Mon, August 1st, I'll post the directions for the side blocks.
Mon, August 8th, I'll post the directions for the corner blocks.

It's just a small quilt along. But I've never even FOLLOWED someone else's quilt a long, much less done my own. So I am new to this. I'll start little.

And I welcome anyone that wants to join in. I'll even try to figure out a linky or a flikr group for us to share our stars.

Have a great day!


PS, don't forget to drop me a comment and leave me your name, if you're a wantobe quilter! LOTS of prizes you could win over at the Stash, come August.
post signature

Saturday, July 23, 2011

Nine more days till the wantobe quilters campaign!

 I'm getting pretty excited, aren't you?! A quilters campaign, for giving away lots and lots of gorgeous prizes.

Anyone who is NOT a quilter buts wants to BECOME a quilter...you have a chance at winning prizes to help you get things a quilter needs. Mon, Wed and Fri's are your days.

All you do is give me your name, phone number, and email address. On those three days, from August thru October, you make comments on the posts at Stash Manicure. And if your name is drawn as a winner, than I win something too!

NOT only for those of you who are new to quilting...
BUT, Samm has thought of the quilters too..

"Hello friends and followers, I would love to welcome you
to a Wantobe Quilters Campaign over here. ( http://stashmanicure.blogspot.com)
 They are having quilting supplies to giveaway 5 x a week for 12 weeks. 
Supplies that will have you quilting
before you know it...From sewing machines to irons, to die cutters,
to mats, to rotary cutters, sewing baskets, scissors, batting, needles,
rolled sewing machine bags, patterns, books, magazines...everything
you could imagine to assist you in being a NEW Quilter. 
Even if you are already part of this community you can win
quilting stuff too...Tuesday and Thursday are days for us..
All you have to do is give me your name and phone number 
and email sew I can submit this to the organizer, because if you win
anything I can win something too. 
All you have to do is be my follower and a follower
That is all! There are over 49 Sponsors involved.
I am pretty excited to be part of this, sew should you.
I love being a QUILTER! 

( p.s you will not be eligible to win anything if you do not register
with a blogger where you see this message)


 See, it says that on Tues and Thurs us quilters have a chance at winning some prizes too! All you have to do is give me your name, phone number and email address. And I can give those to Samm. So if YOU win, then I can win also.

You also have to be a follower though, both of my blog and Stash Manicure.

So get me your names, and make sure you read the blog posts over at Stash from August thru October. Makes some comments on Tues and Thurs, and lets win some goodies!

You can email me at homesteadmom3 at gmail dot com. Or you can comment and let me know you want to be listed, and I'll email you back to get your info.


Have a great day!

post signature

Tuesday, July 19, 2011

A quilt a long?

 I first want to welcome my new followers ::waving hello:::: so glad you are here.

And then I want to thank you all SO MUCH for the lovely comments on my diamond post. This is such  a lovely design. And I would love to show you how easy it is, using the strip method.

So, I have a poll up (on the upper left there). Do you:

Want to do a quilt a long with me? The quilt would be wall hanging size, consisting of a lone star in the center and two other blocks going around the outside. (EXAMPLE: the star in the center would be the lone star. The blue corners would be the same pieced block,and the pinks would be the same pieced block).


OR...

I can just do a full tutorial on making the lone star.

If you are interested, please do my poll.


PS, don't forget to drop me a comment and leave me your name, if you're a wantobe quilter! LOTS of prizes you could win over at the Stash, come August.
post signature

Monday, July 18, 2011

Guest blogging, again....

 I AM GUEST BLOGGING HERE TODAY!!


Hmmm....my Stash button is not working...Stash Manicure...that's where I am blogging today :)


>
If you are looking for Jessica Smiths patterns, you can find them here:

quilt and needles store


I just finished another pieced top yesterday.


It was made from swap fabric that the Gals and I on the Q&N swapped last year.
That means that I now have 25 ....yes 25!!! quilt tops that need to be quilted.

YIKES!!

Guess I should get started, huh?!  :)

PS, don't forget to drop me a comment (or send me an email) and leave me your name, if you're a wantobe quilter! LOTS of prizes you could win over at the Stash, come August.


post signature

Tuesday, July 12, 2011

Art tote tutorial -UPDATED


Good morning out there!

A few of you wanted to see a tutorial for my art bag. So here ya go!

I'm linking up with MaryAnn and H&M today (buttons on the side bar), thanks girls!

You will need two 17.5”x24.5” rectangles of fabric. One for the inside, one for the outside. They can be the same or different fabric. I also used two 15”x 10” pieces of thin cardboard. But if you want yours less stiff, you can use batting at 17.5”x24.5” Or even iron on some interfacing of your choice, on the wrong sides of both outside and inside rectangle.

You'll also need (contrasting colors):

a 13”x14” rectangle
three- 11.5” x 7” rectangles
four- 3" x 20" strips for handles

Fabric to contrast with pockets:
one- 2” x 11” strip
one- 2” x 13” strip

one- 11” zipper

one-2.5" x.....  for binding

( Just a note on my pictures. Sorry a few of them are a little blurry. Also, on my pockets you'll see some seam lines that don't have anything to do with the project. I just didn't have pieces big enough, so had to sew a few pieces together :)  My red fabric has interfacing on it. That's the way the fabric came, it is not necessary for you to put it on though.)

Using two of your 11.5” x 7” rectangles, lay one face up and put zipper right side down on top of it. Using your zipper foot, sew down one side of zipper.


Open and sew top seam down.

Lay next rectangle right side down on top of zipper. Sew down. Open and sew top seam down.


Open zipper about half way. Place rectangles right sides together, and sew down one side, along the bottom and up the other side. Taking back stitches at start and stop.Trim your corners.


Turn right side out and press.


Fold 2”x 11” contrasting strip wrong sides together, lengthwise. Place raw edges along the front side of the other 7”x11” rectangle. Sew a 1/4” seam line.

Wrap strip to wrong side of fabric and sew down.

Do these two steps with  13"x14" rectangle and 2"x13" contrasting strip.


 On 17.5” x 24.5” inside rectangle, draw two lines 1 3/8” right in the center of the fabric.


On the left side of your inside rectangle, measure 2” down from top and 1” from drawn line. Place your zipper pocket at these measurements. And sew down one side, along the bottom and up the other side. Back stitching at start and stop.


Turn sides and bottom of the other 7”x11” rectangle  under 1/4” and sew seam down.

 Below zip pocket, measure 1” up from bottom and 1” from drawn line, place rectangle at these measurements, pin and sew in place. Down one side, across the bottom, up the other. Taking back stitches at start and stop.


Take large 13”x14” rectangle, Turn under side and bottom 1/4” and sew a seam.

On right side of bag, measure 1” up from bottom, and start 1/4” away from right hand drawn line. Place large pocket rectangle here and sew down left side.


Accordian fold the left side 1/2”. Pin.


On the right side of rectangle, measure 1” from ridge hand edge. Pin right edge at this mark. It will bump up, but that's ok, you'll fix it in a minute.  Sew with a 1/4" seam.


Now fold that 'bump' down, aligning it with the edge you just sewed. Making an accordian pleat.


Sew along the bottom, making sure you sew right over those accordian pleats.


Sigh~ I forgot to do this step until my bag was complete! So I don't have pictures..sorry, if you need me to take some photos of how I do my handles, send me a comment or email and I'll make some up.

Take two 3"x20 strips, right sides together, sew down both long sides. Turn right side out (a pain, I know!) and sew 3 or 4 straight lines all down the strips. Do this with your other two handle strips also.

Measure 2" down from side of outside 17.5"x24.5" rectangle, and 4" in from top.  Fold under one short side of handle strip 1/2". And sew it to the rectangle at your mark.  Mark 2" down and 4" from bottom and sew other side of handle here. You'll do this to both short edges of your outside rectangle, on the right side of the fabric.


Put your outside 17.5"x24.5" rectangle right side down on your table. (If you are using batting and NOT cardboard, lay this on top of outside rectangle.) Lay your inside rectangle on it, so your pockets are all facing up. Pin to hold in place, and sew down both of the drawn lines, in the center of the inside rectangle.


If you are using card board, now is the time to slip them in. Do one side first, putting it between the inside and outside rectangles.

Sew along the top/side/bottom, starting and stopping at the center line that is already sewn. Taking back stitches at start and stop.

 Do this to both sides. Enclosing the cardboard, be careful not to sew on it! 

 Take your binding, fold lengthwise, wrong sides together. Pin on outside piece, ROUNDING THE CORNERS and sew it all down. (I'm sure you've all sewn binding down on a quilt, right?? So just do this one the same way. Sorry I have no photos. I was having 'one of those days' when I put this together...sigh~ and if you don't know how to sew a binding down, I have a tutorial on my tutorial page.) Wrap around to inside and sew down. Then cut off the tips of the corners, where you rounded it.

UPDATEOk, here's the zipper:


If you don't have a long enough zipper to go around, use two. I needed to use two. Put the back end (the side with the stopper) in between the drawn lines and pin it. Unzip the zipper, and make one side go along the right hand bottom edge (right on top of the binding), pinning and rounding it around the corner. 


You're zipper will bump up just a little where it turns this sharp corner, right out the door, but that's ok, it can be sewn down.


Pinning the zipper right on top of the binding.


 Side view when closed


Front view when closed.


Again everyone, I'm so sorry for missing some steps yesterday. Not my best tutorial, please feel free to email me or drop me a comment if you have any questions.

Thanks for stopping by Dorian

PS, don't forget to drop me a comment and leave me your name and email addy, if you're a wantobe quilter! LOTS of prizes you could win over at the Stash, come August.
©Copyright D. Lucas, 2011 This is my tutorial. You are welcome to use any of my tutorials for personal use. You are not permitted to use my pictures or my words without linking back to the original and giving me credit for them.

LinkWithin

Related Posts Plugin for WordPress, Blogger...